Staring at a pile of things I was about to throw away, I realized some of them could hold soil and plants. An old colander. A broken watering can. A wooden crate with missing slats. Garden planters made from recycled items isn’t about being resourceful or trendy. It’s about noticing that something still has life in it even when it stops doing what it was originally made for.
I drilled holes in the bottom of the colander and filled it with soil. The watering can became a hanging planter. The crate held herbs near the kitchen door. Each one works differently, holds water at different rates, looks unlike anything you’d buy at a store.
What surprised me was how much more I watered them, how much more I noticed them. They weren’t generic. They had stories.
Wooden Crates
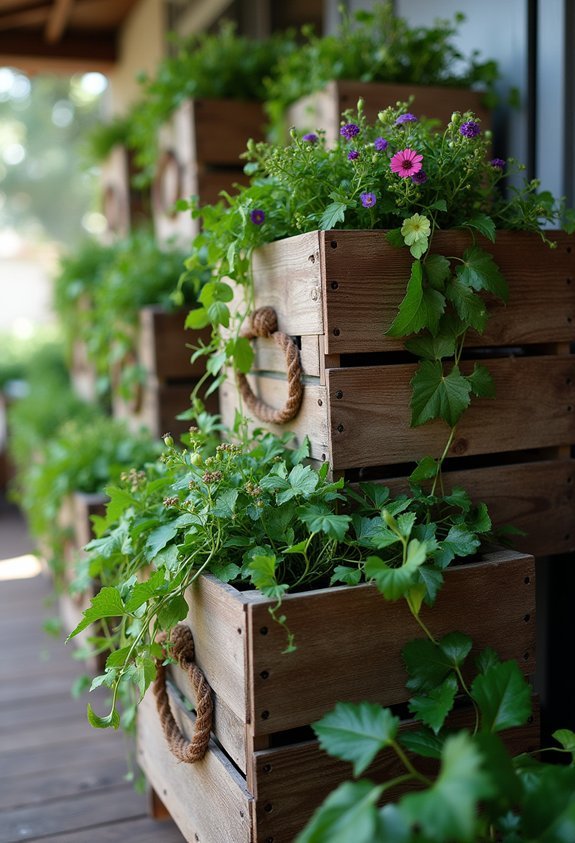
Whether you’re upcycling old fruit crates or repurposing shipping containers, wooden crates offer a rustic foundation for garden planters. I’ve found they’re perfect for creating raised beds or standalone containers that add character to any outdoor space.
You’ll want to line the interior with landscape fabric to prevent soil from spilling through the gaps. This simple step extends your crate’s lifespan considerably. I typically drill drainage holes in the bottom to guarantee proper water flow—essential for plant health.
What makes wooden crates especially appealing is their versatility. Stack them for vertical gardens, arrange them in patterns, or leave them standalone. They accommodate various plant sizes and types beautifully. Over time, they’ll weather naturally, developing a beautiful patina that complements most garden designs.
Also read: 13 Patio Deck Designs for Outdoor Living
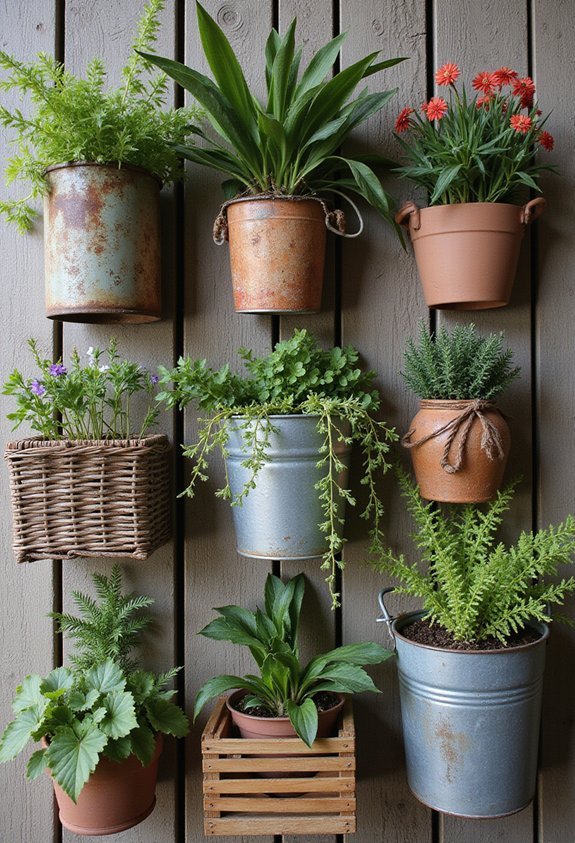
Tin Cans
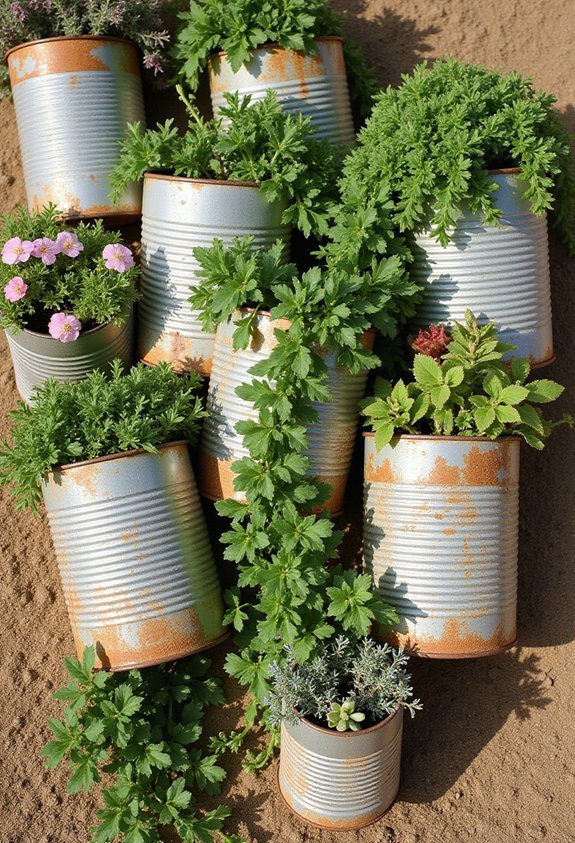
If you’re looking for planters that are even more budget-friendly than wooden crates, tin cans deliver charm on a shoestring. I’ve transformed countless discarded cans into thriving homes for succulents, herbs, and flowers. The process couldn’t be simpler: rinse the can thoroughly, drill drainage holes in the bottom, and fill it with potting soil. I paint mine in vibrant colors or leave them rustic for an industrial aesthetic. Tin cans work exceptionally well for shallow-rooted plants and fit perfectly on windowsills or shelves. Stack them vertically to create striking displays, or cluster them in groups for visual impact. Their lightweight nature makes repositioning effortless as seasons change. Best of all, you’re reducing waste while cultivating beauty.
Old Boots
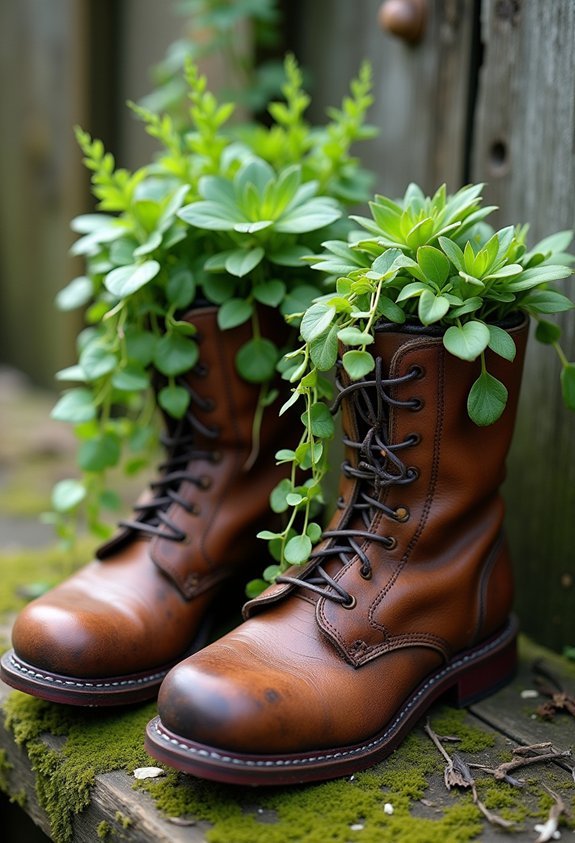
Old boots destined for the donation pile make surprisingly excellent planters that add rustic character to any garden space. I’ve found that worn leather boots work best because they’re durable enough to withstand weather and moisture. You’ll want to drill drainage holes in the soles to prevent waterlogging. I typically fill them with potting soil and plant trailing succulents or small flowers that cascade over the sides, creating a charming display. Pairing mismatched boots together enhances their quirky appeal. You can arrange them along garden edges, on patios, or windowsills. The aged patina of old boots complements natural plantings beautifully. This upcycling project costs you nothing while giving worn footwear a purposeful second life. Your guests will appreciate both the creativity and sustainability of your repurposed garden design.
Broken Terracotta Pots
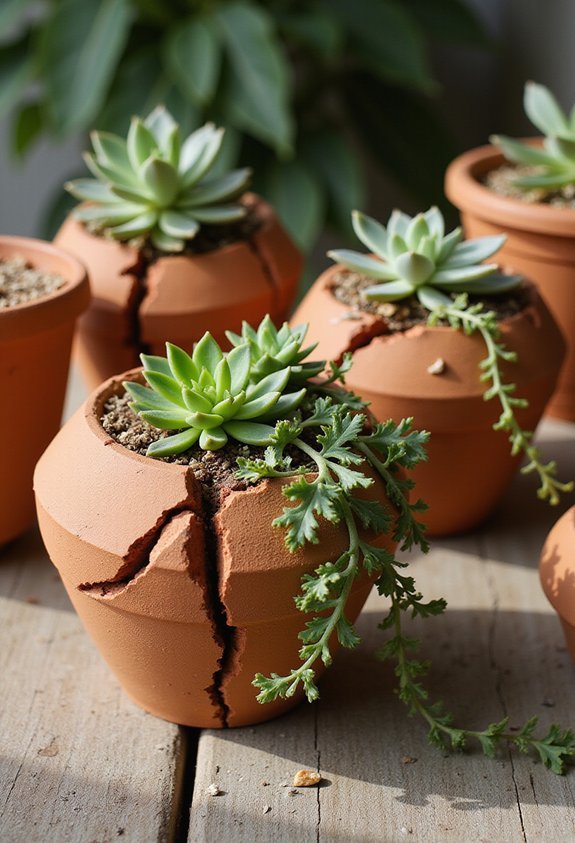
Countless broken terracotta pots that’d normally end up in the trash can become striking mosaic planters with minimal effort. I’ve discovered this transformation requires just a few materials: broken pot shards, waterproof adhesive, and grout.
Start by selecting a sturdy base pot—one without cracks. I arrange colorful shards across its surface, creating patterns that reflect my aesthetic preferences. Once I’m satisfied with the design, I apply waterproof adhesive to each piece and press it firmly into place.
After the adhesive dries completely, I fill the gaps with grout, smoothing it evenly across the surface. A final rinse reveals vibrant mosaics that brighten any garden space.
This upcycling method transforms garden waste into functional art while reducing landfill contributions.
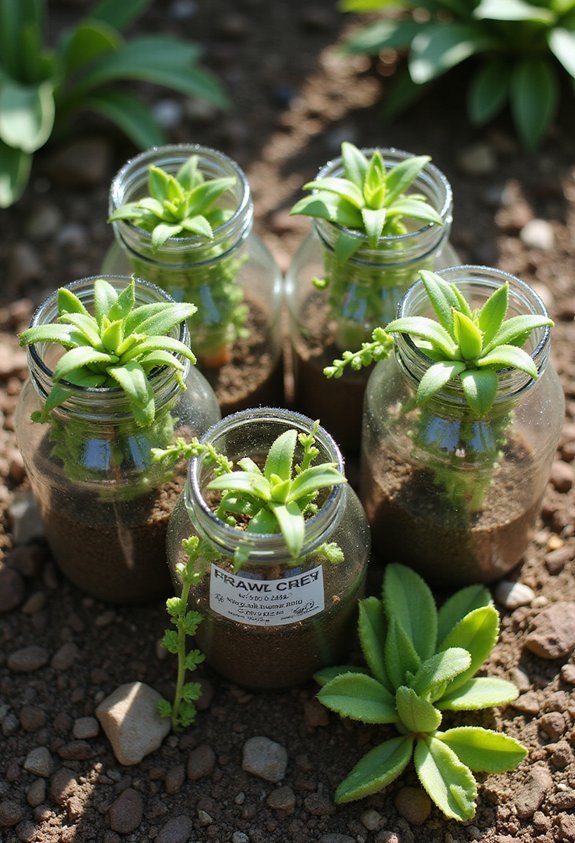
Mason Jars
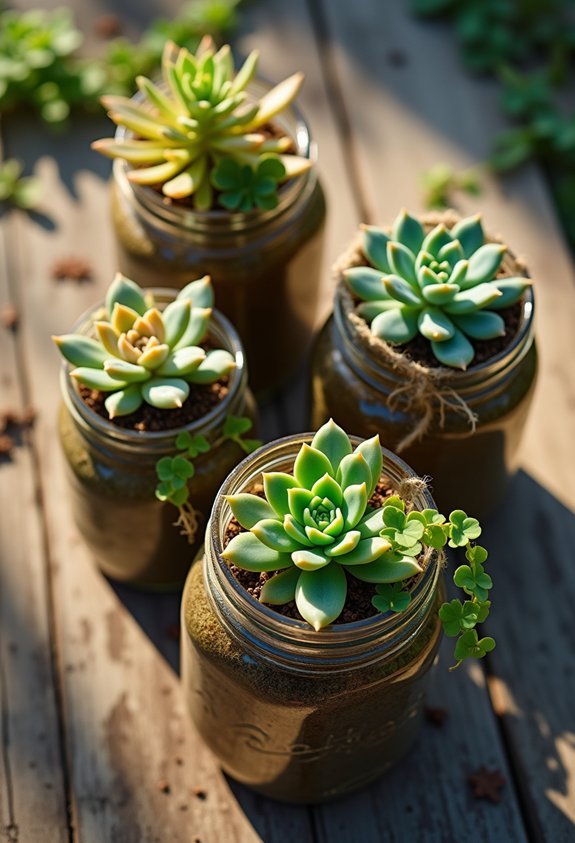
Mason jars offer another excellent opportunity to upcycle garden waste into functional planters. I’ve found that these glass containers work wonderfully for small herbs, succulents, and seedlings. Their transparency lets you monitor soil moisture and root development, which I find helpful when starting new plants.
You’ll want to drill drainage holes in the bottom to prevent waterlogging. I typically use a glass drill bit for this task. The jars’ versatility allows you to hang them from strings or place them on shelves, maximizing your garden space.
I recommend using mason jars for indoor gardening or creating a tabletop herb garden. Their uniform shape makes stacking easy, and you can label them with plant names using permanent markers. This approach transforms ordinary jars into attractive, practical growing vessels.
Wooden Pallets
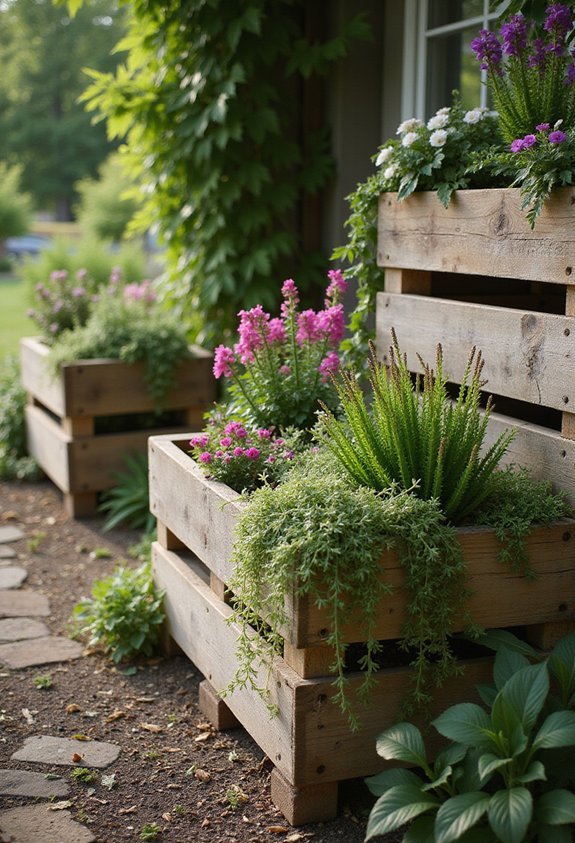
Because they’re sturdy and readily available, wooden pallets make excellent vertical garden planters that’ll maximize your growing space. I’ve found that you can easily convert them into tiered planting systems by positioning them upright and adding landscape fabric to hold soil and plants.
You’ll want to source pallets from local businesses or retailers, ensuring they haven’t been chemically treated. Sand any rough edges, then arrange your pallet horizontally or vertically depending on your space constraints. I recommend adding a waterproof barrier to protect the wood from constant moisture exposure.
Fill each pocket with potting soil and plant herbs, succulents, or trailing flowers. This approach saves money while transforming what would otherwise be waste into functional garden infrastructure. Your vertical pallet garden creates visual interest while producing fresh vegetables or flowers.
Teacups and Saucers
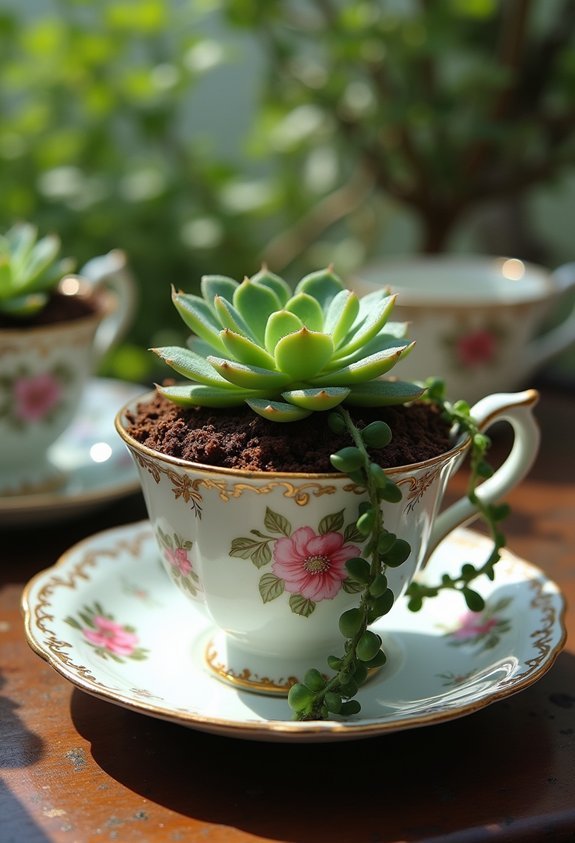
While you’re searching for creative planters, don’t overlook the charm and practicality of vintage teacups and saucers gathering dust in your cupboards. I’ve discovered that these delicate vessels make surprisingly excellent small planters for succulents, herbs, and trailing plants.
The beauty of this approach lies in its simplicity. You’ll need only a teacup, saucer, and drainage holes—easily created with a small drill. I place the saucer underneath to catch water runoff, protecting furniture surfaces.
What I appreciate most is how teacups add vintage elegance to garden displays. They’re perfect for shallow-rooted plants and windowsill arrangements. Since they’re typically shallow, I fill them with well-draining soil and select appropriately sized specimens.
This recycling method transforms forgotten dishware into functional garden art while reducing waste and adding personality to your outdoor space.
Plastic Bottles
If you’re looking for an even more abundant recycling resource, plastic bottles offer versatility that teacups simply can’t match. I’ve found that two-liter bottles work wonderfully as large planters, while smaller bottles suit herbs and succulents perfectly. You’ll need to drill drainage holes in the bottom—a simple task that takes minutes.
I cut bottles in half lengthwise to create shallow containers for low-growing plants. This method maximizes your material since you’re fundamentally getting two planters from one bottle. The translucent quality lets you monitor soil moisture easily, which I appreciate when watering.
Stack bottles vertically to build tower gardens that save valuable garden space. Paint them in vibrant colors to enhance your garden’s aesthetic appeal. Plastic bottles’ lightweight nature makes them ideal for hanging arrangements or portable displays.
Colanders and Strainers
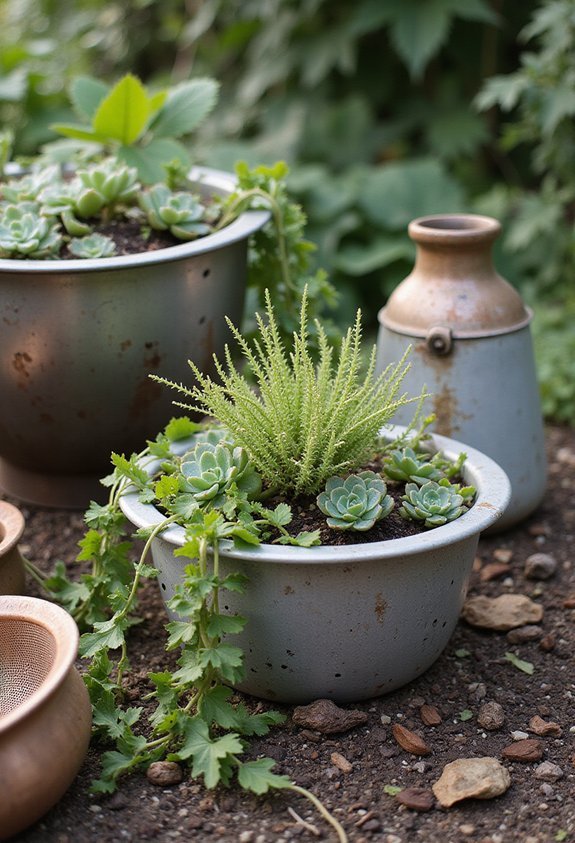
Colanders and strainers make excellent planters once you’ve repurposed them from the kitchen. I’ve found that their built-in drainage holes eliminate the need for modifications, making them ideal for herbs, succulents, and small flowering plants. You can hang them using sturdy wire or rope, creating vertical garden displays that save valuable ground space.
I recommend choosing stainless steel or metal colanders, as they withstand outdoor conditions better than plastic alternatives. Before planting, I line the bottom with newspaper or landscape fabric to contain soil while maintaining drainage. This simple step prevents excessive water loss during hot months.
Their varied sizes let you create tiered arrangements on shelves or walls. I’ve transformed old kitchen strainers into charming focal points that add character to patios and balconies while reducing waste.
Wooden Barrels
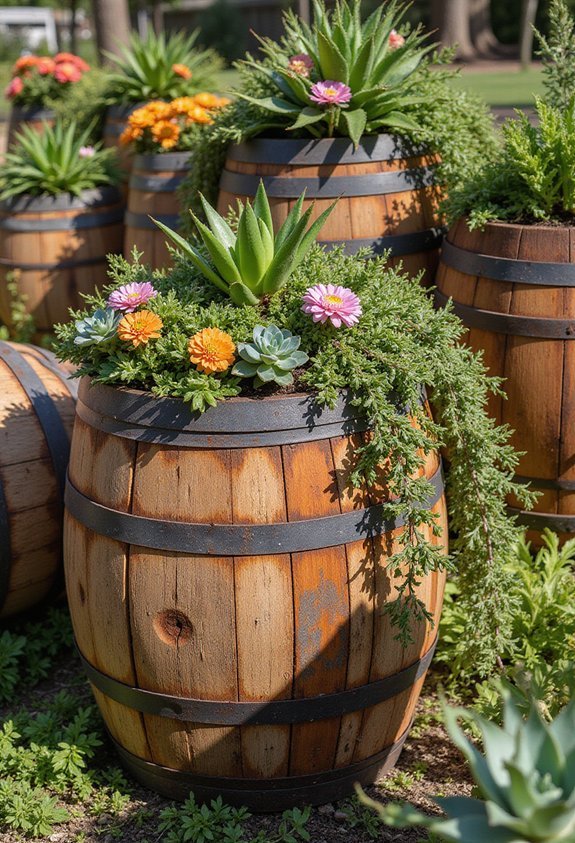
Wooden barrels offer substantial planting space and rustic charm that’ll elevate any garden aesthetic. I’ve found they’re ideal for growing vegetables, herbs, and ornamental plants without requiring extensive yard space.
Before planting, I drill drainage holes in the barrel’s bottom to prevent waterlogging. I line the interior with landscape fabric to extend the wood’s lifespan and contain soil effectively. Filling the barrel with quality potting mix gives plants the nutrients they need to thrive.
These containers work beautifully as focal points along pathways or patios. I’ve discovered that half-barrels are particularly versatile, accommodating everything from strawberries to dwarf fruit trees. The wood weathers naturally over time, developing character while remaining structurally sound for several growing seasons.
Repurposed Drawers
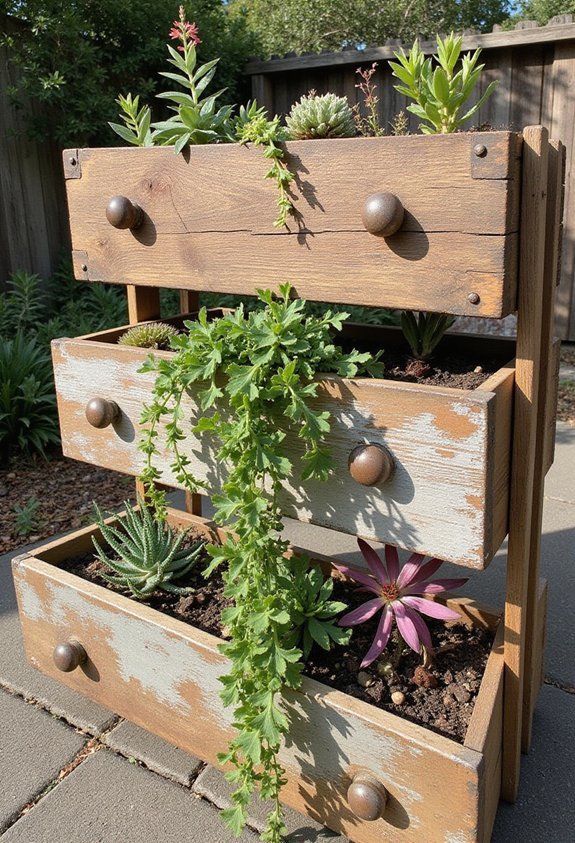
Because old drawers possess natural depth and structural integrity, they’ve become my go-to solution for shallow-rooted plants like succulents and herbs. I’ve salvaged drawers from thrift stores, estate sales, and curb pickups, transforming them into functional garden beds.
Before planting, I line the bottom with landscape fabric to prevent soil from spilling through gaps. Then I add drainage holes using a drill if needed. The existing wooden frame provides excellent structural support, and I can stack multiple drawers to create vertical gardens that maximize small spaces.
I’ve found that drawer planters work exceptionally well on patios, balconies, and window sills. Their varied sizes and finishes add rustic charm to any garden setting. This approach eliminates waste while creating affordable, attractive planters that brighten my outdoor spaces.
Old Bathtubs
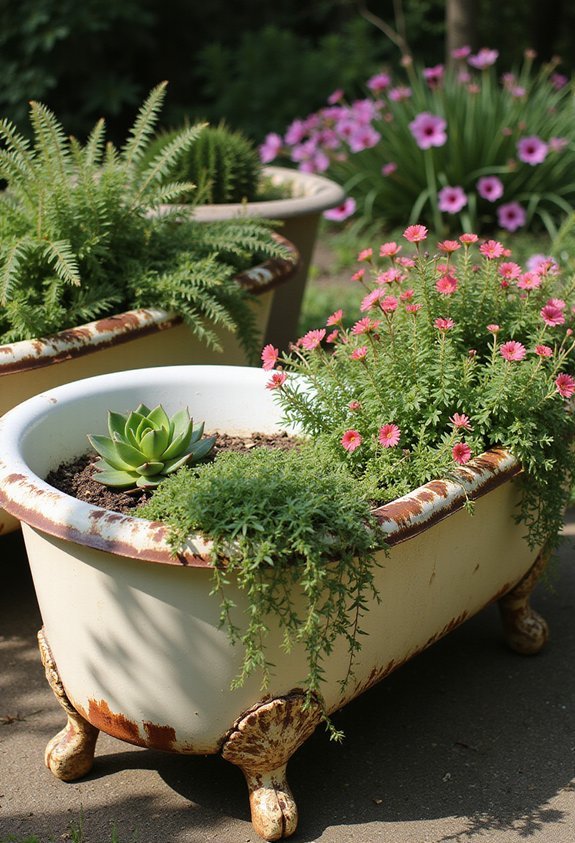
Old bathtubs offer an unexpected advantage: they’re spacious vessels that can accommodate deep-rooted plants and even small shrubs. I’ve found that their depth makes them ideal for vegetables, perennials, and flowering plants that require substantial soil. You’ll want to drill drainage holes in the bottom to prevent waterlogging, which I recommend doing with a masonry bit.
Position your bathtub planter in a location that matches your plants’ sunlight needs. The tub’s white or colored finish can brighten your garden aesthetic, though you might paint it to match your landscape design. Fill it with quality potting soil and compost, then plant according to your preferences.
This approach transforms an old fixture into functional garden infrastructure while reducing waste considerably.
Galvanized Buckets
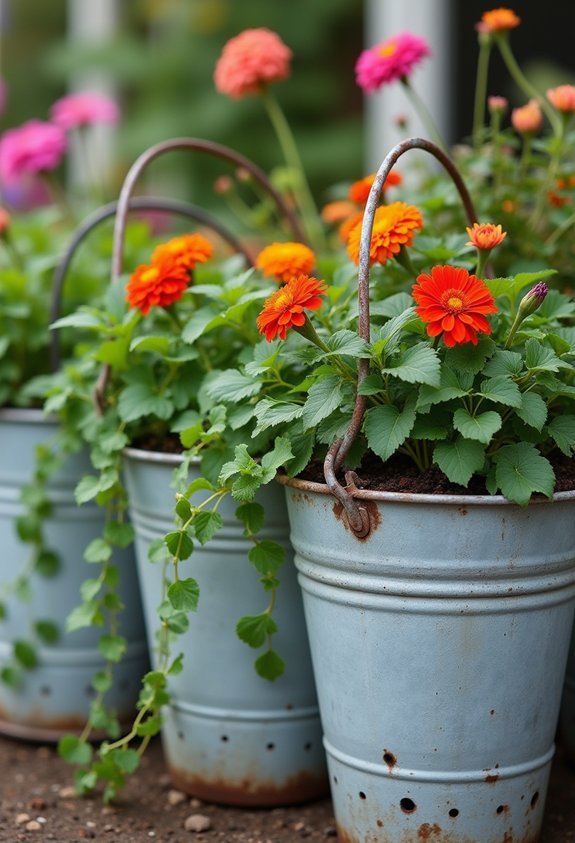
While they’re smaller than bathtubs, galvanized buckets offer portability and charm that make them excellent for container gardening. I’ve found that their compact size lets me arrange multiple planters in tight spaces, creating dynamic garden displays on patios or balconies.
The metal construction naturally ages beautifully, developing a rustic patina that enhances any garden aesthetic. I drill drainage holes in the bottom to prevent root rot, then fill them with quality soil and my favorite plants.
These buckets work wonderfully for herbs, succulents, and flowering plants. Their durability means they’ll withstand years of weather exposure without deteriorating. Plus, I can easily relocate them to follow sunlight patterns throughout the season. Galvanized buckets deliver both functionality and visual appeal at minimal cost.
Frequently Asked Questions
How Do I Ensure Proper Drainage in Planters Without Built-In Drainage Holes?
I’d recommend adding a drainage layer at the bottom of your planter. I create this by placing pebbles, broken pottery shards, or crumpled newspaper before adding soil. This’ll prevent water from pooling around roots and causing rot.
What Soil Type and Depth Do Different Plants Require in Shallow Recycled Containers?
I’d recommend using lightweight potting mix for shallow containers—it’s ideal for succulents needing just 4-6 inches depth. For herbs and flowers, I’d provide 8-10 inches of quality soil. I’ve found that matching soil depth to your plant’s root system guarantees they’ll thrive beautifully.
How Often Should I Water Plants in Various Recycled Planter Materials?
I’d recommend checking soil moisture daily since recycled planters drain differently. Plastic containers retain water longer, so I water them less frequently—every 2-3 days. Terra cotta and wood dry faster, requiring daily watering. You’ll want to adjust based on weather and plant needs.
Which Plants Thrive Best in Smaller Versus Larger Recycled Planter Containers?
I’d recommend herbs and succulents for small recycled containers since they’ve got shallow roots. You’ll want larger planters for tomatoes, peppers, and root vegetables. I’ve found that matching plant size to container depth guarantees you’ll get healthier growth and better yields.
How Do I Weatherproof and Seal Recycled Materials for Outdoor Planting Longevity?
I’ll seal your recycled planters with exterior polyurethane or wood sealant, applying two coats for durability. You’ll want to drill drainage holes and line containers with landscape fabric. I’d also recommend rejuvenating the sealant yearly to protect against weathering.
Conclusion
You’ve discovered how to transform ordinary household items into stunning garden planters. By repurposing wooden crates, tin cans, old boots, and countless other recyclables, you’re creating a more sustainable garden while saving money. You’ll find that these upcycled containers add unique character to your space while supporting thriving plants. Start with items you’ve already got at home, and you’ll soon have a vibrant garden that’s both environmentally conscious and budget-friendly.